Labels

Saturday, 19 September 2026

How To: Enable Google Earth Integration with Hellfire

One of the major new features in Hellfire is the ability to integrate with Google Earth, and provide updates in (almost) real time of your current position, and show you which routes you have travelled on.

You will also notice that there are a significant number of freight lines and branches which do not see regular passenger workings.  If you are in luck, you may even be able to book on a railtour which will cover some of these routes.

To set up Google Earth integration, perform the following steps:

  1. Download and install Google Earth Pro from https://www.google.com/earth/download/gep/agree.html?hl=en-GB. Google Earth Pro is free to use.
  2. Start up Hellfire  and make sure you have updated to at least version 3.13.
  3. Go into Game Settings and select the Google Earth tab.

  4. Select Web Server Mode and press the Set Google Earth Update Folder Button.  Navigate to the folder where you want Hellfire to write the files for Google Earth to Use.
  5. When Hellfire is running, it will write several files for Google Earth to pick up.  You will be prompted to select the location on your computer where you want Hellfire to write these files.  You can create a new folder if you want.  I use My Documents\Hellfire Google Earth since this is easy to navigate to in Windows.
  6. You can optionally set the refresh interval, which determines how often Google Earth should look for updates to the Hellfire Map, and if Google Earth should fly to your current location when you move around the country.
  7. Click OK to leave the game settings, and the files will be written to the location you specified.
If you navigate to the folder where you have told Hellfire to write the Google Earth files, you will see several files.
Double click Hellfire.kml (NOT any of the others) and Google Earth Pro will launch with the Hellfire Map loaded into your Temporary Places.  You only need to do this the first time after setting up the Google Earth integration, since Google Earth will remember this for next time.

Start a new game in Hellfire, and board a train heading into the area covered by the map.  As you approach the first station in the mapped area, Google Earth will zoom to that location.  As you continue to travel around the mapped area, the routes you travel on will change colour (just like highlighting your Bakers Atlas!).

Feel free to experiment with the settings in Google Earth.  Here are my recommended settings, but feel free to use your own.  The forum has an area specifically for Google Earth integration, so please let us all know what works for you.

  • Google Earth Layers - I keep this as uncluttered as possible, so I turn everything off  except Borders and Labels (I sometimes even turn this off as well)
 

  • Auto Refresh and Update View Settings - these are accessed by expanding the Hellfire entry in your Places list, then right-clicking on Hellfire All Line Summer 1981.  Select Properties then select the Refresh tab.


  • Fly to View on Refresh - this option is what keeps your Google Earth view focused on your current location.  If you want to explore the map without it snapping back to your location, then turn this option off.
  • Time-Based Refresh - this is set to 2 seconds by default.  If you set this too short, then you will see the view 'bouncing' as it refreshes faster than the time taken for Google Earth to point its view to your new location.  Setting this time too long means that Google Earth will lag behind your current position.  You can increase the speed of travel in Google Earth and use a shorter refresh interval, but I found that it became difficult to follow where you were when the game was run at full speed.  Feel free to experiment, however.
When you exit from Google Earth, you will be asked if you want to save the items in your Temporary Places folder to your My Places folder.  I recommend that you do this because Google Earth will then always start up with the Hellfire Map loaded and ready to go.  You can always deselect the Hellfire Map if you don't want to see it.

Important - once you have the Hellfire Map on your My Places folder, do NOT start up Google Earth by double-clicking Hellfire.kml again.  This will result in multiple instance of the map being loaded up into Google Earth.

Have fun exploring this feature in Hellfire!

Saturday, 24 September 2022

How to Switch to and from Pre-release Versions of Hellfire

 From time to time, prior to the release of major new features in Hellfire, these features need to be tested publicly.  This is done by offering Hellfire in a sneak preview "pre-release" version which anybody can try out.

Beware that pre-release versions contain features they may not be fully complete, and may suffer from crashes, performance loss, and lockups.  You should save your games often, and if you suffer a repeated crash or lockup then sending in the saved game will help to diagnose the problem.  Your saved game will also be fixed where possible so you will be able to continue you game.

If you want to take part in testing upcoming features then you can do this at any time.  You can also switch back to the stable version of Hellfire (but be aware that saved games or career files saved with a pre-release version may not load under the current stable version).

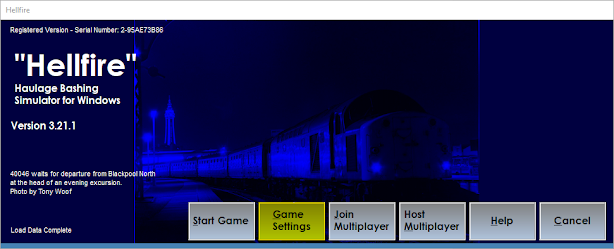
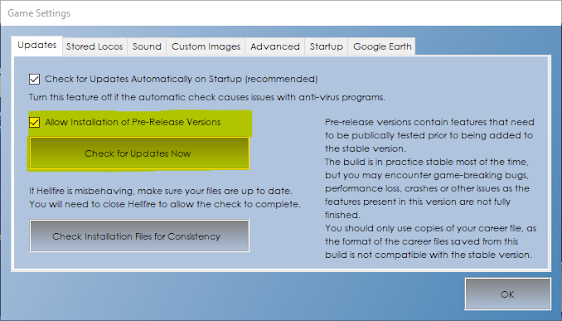
Switching to the current pre-release version is straightforward; launch Hellfire and select Game Settings.


Tick the option to "Allow Installation of Pre-release Versions" and then select "Check for Updates Now" (Note that you have to check for updates for the first time in this screen otherwise your preference won't be saved).

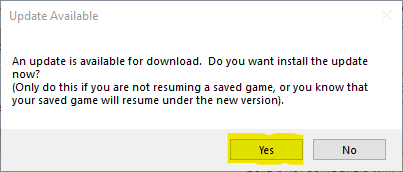
You will receive a notification that there is an update to be downloaded. Click Yes to start the download.

Hellfire will shut down, and the Hellfire Updater will start, prompting you to download the new version (just as per a normal update).

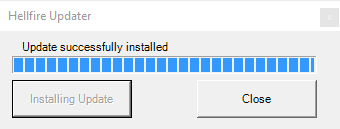
When the update has been installed, you can close the updater and restart Hellfire.

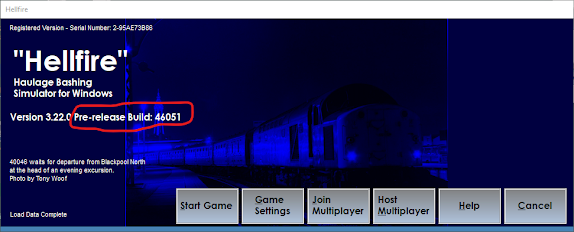
You will know you are running a pre-release build when you see the build number on the opening screen.


Should you ever want to go back to the stable version, simply uncheck the "Allow Installation of Pre-release Versions" and carry out the above steps; Hellfire will switch back to the stable channel.


Wednesday, 13 January 2021

How To: Update my Google Earth Hellfire Map

 This might sound like a rather strange topic for a blog post, since the map seems to update automatically.

This is true, but from time to time new features may be added, or the structure of the Hellfire Google Earth Map might change, necessitating a complete deletion and recreation of the Hellfire Map in Google Earth.

Note that performing this task will not result in you losing your route history.

You may be instructed to update your Google Earth Map when you install an update to Hellfire.  If this is the case, carry out the following steps.

  1. Locate the Hellfire root folder in the My Places folder.  In the above image, it is the folder highlighted in blue.  Note: it is NOT the one sitting under the Hellfire Real Time Updates folder.
  2. Delete the Hellfire root folder (press the delete key)

  3. Click OK to confirm.
  4. Start the newly updated version of Hellfire and when it has finished loading, go into Game Settings
  5. Select the Google Earth tab and then select Configure Local Mode.
  6. If you have previously configured Google Earth (quite likely if you are now updating the map) you will already see the current location of the folder where Hellfire is writing its files for Google Earth. 

    Even if you do see the current folder location (as in the above image) you still need to click Select Local Folder.  

  7. There is no need to change the previously selected folder.  Just hit OK to close the dialog box and the updated file will be written to the folder.
  8. Just as when you set up Google Earth for the first time, double click Hellfire.kml (NOT Update.kmz) and Google Earth will load up the new map.
  9. You can now start up a Hellfire Game if desired.
  10. When exiting Google Earth, you will be prompted to save items from your Temporary Places folder into your My Places folder.  I recommend you do this to avoid having to find Hellfire.kml every time you want to load up the Hellfire map in Google Earth.
  11. Important - once you have the Hellfire Map on your My Places folder, do NOT start up Google Earth by double-clicking Hellfire.kml again.  This will result in multiple instance of the map being loaded up into Google Earth.
  12. For full details on setting up Google Earth with Hellfire, see https://railrover.blogspot.com/2020/08/how-to-enable-google-earth-integration.html


Wednesday, 20 February 2019

How To: Keep Hellfire up to Date

This might seem to be a strange topic for a blog post, but the steadily increasing security of Windows systems can cause problems when trying to update Hellfire.

Because the updating process needs to copy files into your Program Files(x86) folder, you need to give your computer explicit permission to do so.  Because of this, automatic updating of Hellfire can sometimes fail, and has been one of the main causes of erratic behaviour and random error messages in the past.  Indeed, many people have opted to turn off automatic updating in favour of just downloading the full install every time there is an update.

Starting with Hellfire V3.6.1, there is a completely new updating mechanism, which displays its progress to you, and will also let you know if there is a problem trying to update.

Firstly,  ensure you have updated to at least Hellfire V3.6.0.  This will require downloading a full install, once auto updates are turned back on, versions prior to V3.6.0 may not correctly update using the auto update mechanism.

Next, make sure you have auto updates turned on (it is turned on by default, but please consider re-enabling this if you have it turned off, unless you experience issues with anti virus programs complaining).

To ensure auto updates are enabled, select Game Settings from the opening screen and select the Updates tab.  Make sure the Check for updates Automatically on Startup option is ticked.


Close the screen and Hellfire will check for updates.  If there is an update available, you will see a message at the top right of the opening screen.


Click on the message to launch the updater.

Click Yes to start the update.  The updater will wait for Hellfire to completely shut down (this can take a few seconds after Hellfire disappears from view) before it prompts to download the update.


Once the update has finished downloading, the updater will prompt you to close it.


Hellfire has now been updated and you can start it as per usual.

Sometimes the updater cannot access a file it wants to update.  If this happens, the updater will stop and display a message saying it is waiting to unlock a file.  You may also see a Windows error message detailing a 'Permission Denied' error.


In either of the above situations, close the updater using the red cross at the top right of the window (or click Close on the 'Permission Denied' window) and restart Hellfire.  Try to run the update again by clicking on the update message - it should run successfully this time.  If you don't have any luck after retrying a few times, let me know (I've tried running this many times and if it doesn't run the first time, it almost always works the second time).


Wednesday, 2 August 2017

How To: Get to Kensington Olympia for those elusive Class 25s on Motorail Services

For those of you not familiar with the London Transport system, you may have resorted to getting to Kensington Olympia by Taxi or Bus, as there does not seem to be a way of getting there by rail (unless you opt for the morning service from Clapham Junction - in itself a possibility for some extremely rare Class 09 haulage!)

The nearest tube station is High Street, Kensington.  This is almost a mile away along Kensington High Street.

To get to Kensington Olympia at any time of the day (when the Clapham Shuttle, or "Kenny Belle" is not a realistic option) simply take the tube to High Street, Kensington from any London Terminus, and walk from there.

For more details surrounding the curious Clapham Junction - Kensington Olympia service at the time, I suggest reading A Beeching Epilogue: The Curious Case of the Clapham Junction Ghost Train

Now there is no excuse (apart from the amount of points required) not to bag those Cricklewood Class 25s!

Friday, 10 March 2017

How To: Add New Locos to Your Needs List

Hellfire Version 3.3.8 includes three Inverness Class 08s which will not appear as required in your needs list unless you manually add them.

If you are not maintaining a career file, then adding the Class 08's is pretty straightforward; simply open up your needs list in your favorite text editor (such as Notepad) and add the following locos to the bottom of your list:

08568
08620
08738

Then save your changes and your needs list is ready to roll.

For those of you running careers, the procedure is a little more involved.

Create a new text file containing the above 3 locos (each loco must be on a new line) and save it somewhere handy.  Alternatively, I have created a file you can use here: http://www.railrover.co.uk/forum/index.php?action=dlattach;topic=875.0;attach=649

Start up Hellfire, and begin a game as normal.  When you get to the screen where you select your career file, select it, and then select Browse For Needs List. Note that you can do this even when you have selected a Career File.


Browse to the text file containing the new locos, and confirm that the path to the file is displayed in the box for Required Locos or Needs List File Name.

Select Start the Game and you should be presented with the following dialog box...


Answer Yes to the above question, and you should get the following...


Make sure you answer Yes to this second question, and the three new Class 08s will appear as required on your needs list.  Note that this differs from the previous post on editing Needs Lists.


Saturday, 4 March 2017

How To: Use your own Images in Hellfire

The locomotive images supplied with Hellfire are, lets face it, pretty average.

They date back to when the game was first released, and Internet bandwidth was much less than it is now.  In order to save on file size, the images were black and white, and saved at a fairly low resolution (by today's standards).

I had been receiving requests to permit people to substitute their own images in the game, and this is now a possibility in Hellfire 3.

There are two ways of doing this.

The first way - best for handling small numbers of images - is to use the Image Manager built into Hellfire.  This allows you to select images to use in place of the generic locomotive class pictures, and also to use an image for individual locomotives.  The Image Manager is accessed from the Game Settings on the opening screen.


Select the Custom Images tab, and click Image Manager.


Select either Loco Types, or Locos from the left-hand list, then select the actual Loco Type or Loco from the middle list for which you use your own image.  Then simply drag and drop the file from a Windows folder, or your Desktop, into the blank space on the right-hand side.  The image should appear in the space.  Repeat as necessary.  When you have finished - click Save to save your image choices.  If you need to, you can click Undo to reset the images back to the point you last saved them.

The second option is best when you want to install a large number of images.  The images need to be named correctly, using just the loco number, so for example, if you want to use an image for 03162, your image must be called 03162.bmp/jpg/gif etc.

Using Windows Explorer, navigate to your My Documents folder and create a new sub folder called HellfireImages (if it doesn't already exist) and simply copy your images into there.  This technique does involve a lot of file renaming if you are using a collection of files you have sourced yourself, or you can take advantage of Ian Banks-Jones hard work and download a complete set of named, colour adjusted and cropped images.  Simply decompress and copy the images into HellfireImages to give yourself a complete set of loco images.  A link to the latest version of the images can be found in the forum at http://www.railrover.co.uk/forum/index.php?topic=673.0.  Owing to restrictions on copyright, I cannot distribute these images as part of the game, but they are allowed for your own personal use.

I hope you find this useful, and you enjoy Hellfire with your own images.